|
Come citare 1. Per la citazione nel testo (Materiali e Metodi): 2. Per la tabella delle risorse chiave: |
||
|
Numero verde: (877) 796-6397 -- Solo USA e Canada -- |
Fax: +1-832-582-8590 Ordini: +1-832-582-8158 |
Supporto tecnico: +1-832-582-8158 Ext:3 Si prega di fornire il numero dordine nelle-mail. Ci sforziamo di rispondere a tutte le richieste via e-mail entro un giorno lavorativo. |
Descrizione biologica
| Specificità | STOP Antibody [D23F6] riconosce i livelli endogeni delle proteine N-STOP e O-STOP totali. |
|---|---|
| Contesto | STOP (Stable Tubule Only Polypeptide) è una proteina neuronale che lega la calmodulina e i microtubuli, essenziale per la stabilizzazione dei microtubuli e la plasticità sinaptica. Strutturalmente, STOP è una proteina Microtubule Associated contenente domini sovrapposti di legame alla calmodulina e di stabilizzazione dei microtubuli, ed esiste in molteplici isoforme come E-STOP e N-STOP, generate attraverso lo splicing alternativo di un singolo gene. L'espressione di STOP aumenta durante la differenziazione neuronale, con varianti distinte espresse in diverse fasi dello sviluppo. Funzionalmente, STOP stabilizza i microtubuli contro la depolimerizzazione indotta dal freddo e dai farmaci, supporta la crescita dei neuriti e contribuisce alla funzione sinaptica. La fosforilazione di STOP da parte della CaMKII porta alla sua dissociazione dai microtubuli e alla sua rilocazione nei compartimenti sinaptici, dove lega l'actina e regola i pool di vescicole sinaptiche, evidenziando il suo doppio ruolo nel mantenimento dell'integrità della Cytoskeletal Signaling e nel supporto della plasticità sinaptica. |
Informazioni sullutilizzo
| Applicazione | WB ,IF | Diluizione |
|
||||
|---|---|---|---|---|---|---|---|
| Reattività | Human, Mouse, Rat | ||||||
| Fonte | Mouse Monoclonal Antibody | MW | 120 kDa | ||||
| Tampone di conservazione | PBS, pH 7.2+50% Glycerol+0.05% BSA+0.01% NaN3 | Conservazione (Dalla data di ricevimento) |
-20°C (avoid freeze-thaw cycles), 2 years | ||||
| WB |
Experimental Protocol:
Sample preparation
1. Tissue: Lyse the tissue sample by adding an appropriate volume of ice-cold RIPA/NP-40 Lysis Buffer (containing Protease Inhibitor Cocktail),and homogenize the tissue at a low temperature. 2. Adherent cell: Aspirate the culture medium and wash the cells with ice-cold PBS twice. Lyse the cells by adding an appropriate volume of RIPA/NP-40 Lysis Buffer (containing Protease Inhibitor Cocktail) and put the sample on ice for 5 min. 3. Suspension cell: Transfer the culture medium to a pre-cooled centrifuge tube. Centrifuge and aspirate the supernatant. Wash the cells with ice-cold PBS twice. Lyse the cells by adding an appropriate volume of RIPA/NP-40 Lysis Buffer (containing Protease Inhibitor Cocktail) and put the sample on ice for 5 min. 4. Place the lysate into a pre-cooled microcentrifuge tube. Centrifuge at 4°C for 15 min. Collect the supernatant;
5. Remove a small volume of lysate to determine the protein concentration;
6. Combine the lysate with protein loading buffer. Boil 20 µL sample under 95-100°C for 5 min. Centrifuge for 5 min after cool down on ice.
Electrophoretic separation
1. According to the concentration of extracted protein, load appropriate amount of protein sample and marker onto SDS-PAGE gels for electrophoresis. Recommended separating gel (lower gel) concentration: 5%. Reference Table for Selecting SDS-PAGE Separation Gel Concentrations 2. Power up 80V for 30 minutes. Then the power supply is adjusted (110 V~150 V), the Marker is observed, and the electrophoresis can be stopped when the indicator band of the predyed protein Marker where the protein is located is properly separated. (Note that the current should not be too large when electrophoresis, too large current (more than 150 mA) will cause the temperature to rise, affecting the result of running glue. If high currents cannot be avoided, an ice bath can be used to cool the bath.)
Transfer membrane
1. Take out the converter, soak the clip and consumables in the pre-cooled converter;
2. Activate PVDF membrane with methanol for 1 min and rinse with transfer buffer;
3. Install it in the order of "black edge of clip - sponge - filter paper - filter paper - glue -PVDF membrane - filter paper - filter paper - sponge - white edge of clip"; 4. The protein was electrotransferred to PVDF membrane. ( 0.45 µm PVDF membrane is recommended ) Reference Table for Selecting PVDF Membrane Pore Size Specifications Recommended conditions for wet transfer: 200 mA, 120 min. ( Note that the transfer conditions can be adjusted according to the protein size. For high-molecular-weight proteins, a higher current and longer transfer time are recommended. However, ensure that the transfer tank remains at a low temperature to prevent gel melting.)
Block
1. After electrotransfer, wash the film with TBST at room temperature for 5 minutes;
2. Incubate the film in the blocking solution for 1 hour at room temperature;
3. Wash the film with TBST for 3 times, 5 minutes each time.
Antibody incubation
1. Use 5% skim milk powder to prepare the primary antibody working liquid (recommended dilution ratio for primary antibody 1:1000), gently shake and incubate with the film at 4°C overnight; 2. Wash the film with TBST 3 times, 5 minutes each time;
3. Add the secondary antibody to the blocking solution and incubate with the film gently at room temperature for 1 hour;
4. After incubation, wash the film with TBST 3 times for 5 minutes each time.
Antibody staining
1. Add the prepared ECL luminescent substrate (or select other color developing substrate according to the second antibody) and mix evenly;
2. Incubate with the film for 1 minute, remove excess substrate (keep the film moist), wrap with plastic film, and expose in the imaging system.
|
| IF |
Experimental Protocol:
Specimen Preparation
1. Aspirate liquid, then cover cells to a depth of 2–3 mm with 4% Paraformaldehyde diluted in 1X PBS.
NOTE: Paraformaldehyde is toxic, use only in a fume hood.
2. Fix cells for 15 min at room temperature.
3. Aspirate fixative, rinse three times in 1X PBS for 5 min each.
4. Proceed with Immunostaining.
Immunostaining
1. Add theblocking buffer and incubate for 60 min at RT.
2. Prepare primary antibody diluent in antibody dilution buffer as recommended .
3. Aspirate blocking solution, apply diluted primary antibody.
4. Incubate overnight at 4°C.
5. Rinse three times in 1X PBS for 5 min each.
6. Incubate specimens in fluorochrome-conjugated secondary antibody diluted in antibody dilution buffer for 1–2 hr at room temperature in the dark.
7. Rinse three times in 1X PBS for 5 min each.
8. Mount slides usingmounting medium with DAPI and cover with coverslips.
9. For best results, allow mountant to cure overnight at room temperature. For long-term storage, store slides flat at 23°C protected from light.
|
| IF |
Experimental Protocol:
Sample Preparation
1. Adherent Cells: Place a clean, sterile coverslip in a culture dish. Once the cells grow to near confluence as a monolayer, remove the coverslip for further use.
2. Suspension Cells: Seed the cells onto a clean, sterile slide coated with poly-L-lysine.
3. Frozen Sections: Allow the slide to thaw at room temperature. Wash it with pure water or PBS for 2 times, 3 minutes each time.
4. Paraffin Sections: Deparaffinization and rehydration. Wash the slide with pure water or PBS for 3 times, 3 minutes each time. Then perform antigen retrieval.
Fixation
1. Fix the cell coverslips/spots or tissue sections at room temperature using a fixative such as 4% paraformaldehyde (4% PFA) for 10-15 minutes.
2. Wash the sample with PBS for 3 times, 3 minutes each time.
Permeabilization
1.Add a detergent such as 0.1–0.3% Triton X-100 to the sample and incubate at room temperature for 10–20 minutes.
(Note: This step is only required for intracellular antigens. For antigens expressed on the cell membrane, this step is unnecessary.)
Wash the sample with PBS for 3 times, 3 minutes each time.
Blocking
Add blocking solution and incubate at room temperature for at least 1 hour. (Common blocking solutions include: serum from the same source as the secondary antibody, BSA, or goat serum.)
Note: Ensure the sample remains moist during and after the blocking step to prevent drying, which can lead to high background.
Immunofluorescence Staining (Day 1)
1. Remove the blocking solution and add the diluted primary antibody.
2. Incubate the sample in a humidified chamber at 4°C overnight.
Immunofluorescence Staining (Day 2)
1. Remove the primary antibody and wash with PBST for 3 times, 5 minutes each time.
2. Add the diluted fluorescent secondary antibody and incubate in the dark at 4°C for 1–2 hours.
3. Remove the secondary antibody and wash with PBST for 3 times, 5 minutes each time.
4. Add diluted DAPI and incubate at room temperature in the dark for 5–10 minutes.
5. Wash with PBST for 3 times, 5 minutes each time.
Mounting
1. Mount the sample with an anti-fade mounting medium.
2. Allow the slide to dry at room temperature overnight in the dark.
3. Store the slide in a slide storage box at 4°C, protected from light.
|
Riferimenti
|
Dati di applicazione
IF
Validato da Selleck
-
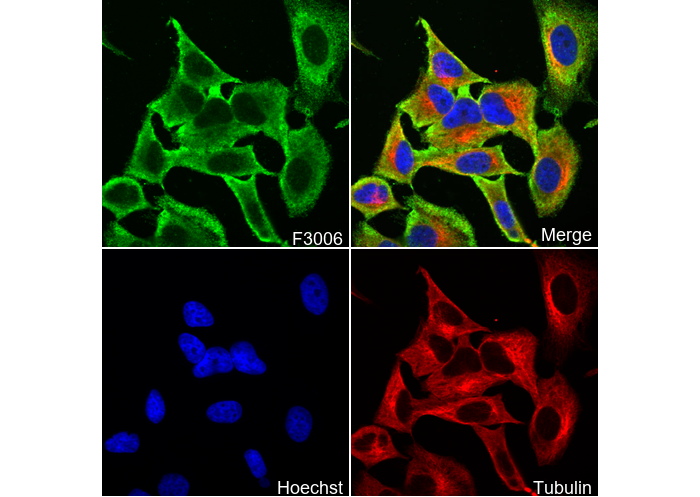 Immunofluorescent analysis of Hela cells using F3006 (green, 1:100), Hoechst (blue) and tubulin (Red).
WB
Validato da Selleck
-
 Lane 1: Rat brain