|
Come citare 1. Per la citazione nel testo (Materiali e Metodi): 2. Per la tabella delle risorse chiave: |
||
|
Numero verde: (877) 796-6397 -- Solo USA e Canada -- |
Fax: +1-832-582-8590 Ordini: +1-832-582-8158 |
Supporto tecnico: +1-832-582-8158 Ext:3 Si prega di fornire il numero dordine nelle-mail. Ci sforziamo di rispondere a tutte le richieste via e-mail entro un giorno lavorativo. |
Descrizione biologica
| Specificità | Phospho-Ubiquitin (Ser65) Antibody [C22F3] riconosce i livelli endogeni della proteina Ubiquitin solo quando fosforilata in Ser65. |
|---|---|
| Contesto | Ubiquitin è un polipeptide altamente conservato che svolge un ruolo centrale nel sistema ubiquitina-proteasoma, un meccanismo chiave per regolare la degradazione delle proteine all'interno delle cellule. Attraverso un processo noto come ubiquitinazione, le molecole di ubiquitina sono legate covalentemente a proteine cellulari specifiche, contrassegnandole per la degradazione dal proteasoma 26S. La cascata di ubiquitinazione coinvolge tre passaggi enzimatici principali: in primo luogo, l'ubiquitina viene attivata dall'enzima E1, formando un legame tioestere. Questa ubiquitina attivata viene quindi trasferita all'enzima E2 coniugante l'ubiquitina. Infine, l'ubiquitina ligasi E3 facilita il trasferimento dell'ubiquitina da E2 alla proteina bersaglio legandola al gruppo epsilon-amminico di un residuo di lisina sul substrato. Il percorso ubiquitina-proteasoma è critico per una vasta gamma di processi fisiologici, inclusa la regolazione del ciclo cellulare, la differenziazione, la risposta allo stress cellulare e l'apoptosi. La disregolazione di questo percorso è stata collegata a varie malattie. Un meccanismo di regolazione comporta la fosforilazione dell'ubiquitina a serina 65 da parte della chinasi PINK1, che attiva l'E3 ligasi Parkin – un passaggio chiave nel controllo di qualità mitocondriale. IκB, p53, cdc25A e Bcl-2 sono substrati noti del sistema ubiquitina-proteasoma, evidenziando il suo ruolo essenziale nel mantenimento dell'omeostasi cellulare e nel controllo di funzioni vitali come le risposte immunitarie, la riparazione del DNA e la morte cellulare programmata. |
Informazioni sullutilizzo
| Applicazione | WB, IP | Diluizione |
|
||||
|---|---|---|---|---|---|---|---|
| Reattività | Human | ||||||
| Fonte | Rabbit Monoclonal Antibody | MW | |||||
| Tampone di conservazione | PBS, pH 7.2+50% Glycerol+0.05% BSA+0.01% NaN3 | Conservazione (Dalla data di ricevimento) |
-20°C (avoid freeze-thaw cycles), 2 years | ||||
| WB |
Experimental Protocol:
Sample preparation
1. Tissue: Lyse the tissue sample by adding an appropriate volume of ice-cold Lysis Buffer (containing Protease Inhibitor Cocktail, Phosphatase Inhibitor Cocktail),and homogenize the tissue at a low temperature. 2. Adherent cell: Aspirate the culture medium and wash the cells with ice-cold PBS twice. Lyse the cells by adding an appropriate volume of Lysis Buffer (containing Protease Inhibitor Cocktail, Phosphatase Inhibitor Cocktail) and put the sample on ice for 5 min. 3. Suspension cell: Transfer the culture medium to a pre-cooled centrifuge tube. Centrifuge and aspirate the supernatant. Wash the cells with ice-cold PBS twice. Lyse the cells by adding an appropriate volume of Lysis Buffer (containing Protease Inhibitor Cocktail, Phosphatase Inhibitor Cocktail) and put the sample on ice for 5 min. 4. Place the lysate into a pre-cooled microcentrifuge tube. Centrifuge at 4°C for 15 min. Collect the supernatant;
5. Remove a small volume of lysate to determine the protein concentration;
6. Combine the lysate with protein loading buffer. Boil 20 µL sample under 95-100°C for 5 min. Centrifuge for 5 min after cool down on ice.
Electrophoretic separation
1. According to the concentration of extracted protein, load appropriate amount of protein sample and marker onto SDS-PAGE gels for electrophoresis. Reference Table for Selecting SDS-PAGE Separation Gel Concentrations 2. Power up 80V for 30 minutes. Then the power supply is adjusted (110 V~150 V), the Marker is observed, and the electrophoresis can be stopped when the indicator band of the predyed protein Marker where the protein is located is properly separated. (Note that the current should not be too large when electrophoresis, too large current (more than 150 mA) will cause the temperature to rise, affecting the result of running glue. If high currents cannot be avoided, an ice bath can be used to cool the bath.)
Transfer membrane
1. Take out the converter, soak the clip and consumables in the pre-cooled converter;
2. Activate PVDF membrane with methanol for 1 min and rinse with transfer buffer;
3. Install it in the order of "black edge of clip - sponge - filter paper - filter paper - glue -PVDF membrane - filter paper - filter paper - sponge - white edge of clip"; 4. The protein was electrotransferred to PVDF membrane. Reference Table for Selecting PVDF Membrane Pore Size Specifications ( Note that the transfer conditions can be adjusted according to the protein size. For high-molecular-weight proteins, a higher current and longer transfer time are recommended. However, ensure that the transfer tank remains at a low temperature to prevent gel melting.)
Block
1. After electrotransfer, wash the film with TBST at room temperature for 5 minutes;
2. Incubate the film in the blocking solution ( recommending 5% BSA solution) for 1 hour at room temperature;
3. Wash the film with TBST for 3 times, 5 minutes each time.
Antibody incubation
1. Use 5% skim milk powder to prepare the primary antibody working liquid (recommended dilution ratio for primary antibody 1:1000), gently shake and incubate with the film at 4°C overnight; 2. Wash the film with TBST 3 times, 5 minutes each time;
3. Add the secondary antibody to the blocking solution and incubate with the film gently at room temperature for 1 hour;
4. After incubation, wash the film with TBST 3 times for 5 minutes each time.
Antibody staining
1. Add the prepared ECL luminescent substrate (or select other color developing substrate according to the second antibody) and mix evenly;
2. Incubate with the film for 1 minute, remove excess substrate (keep the film moist), wrap with plastic film, and expose in the imaging system.
|
Riferimenti
|
Dati di applicazione
WB
Validato da Selleck
-
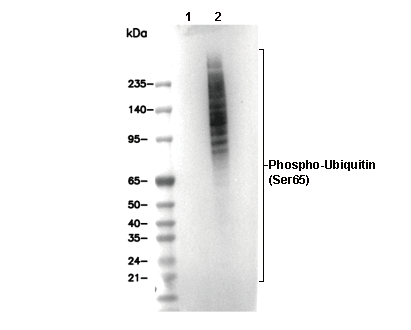 Lane 1: PC-3, Lane 2: PC-3 (carbonyl cyanide 3-chlorophenylhydrazone, 30 μM, 6 h)